Handmade 18ct yellow gold sapphire engagement ring

I first met Dervla and Denis back in February of this year when they approached me about making their engagement ring. They were looking for a simple yet confident ring, suited to architect Dervla's aesthetic. Having done a little homework she had her heart set on a nice big deep blue sapphire and as luck would have it I was headed to one of the biggest jewellery trade fairs of the year in a matter of days. No better place to find just the stone!

With a budget in mind I spent quite a while seeking out a sapphire with the perfect balance of colour, sparkle and scale. There were phone calls to and fro describing the three front runners and numerous return visits to all three. I had mistakenly thought I could take snaps on my smart phone to help inform the decision, but flourescent lighting is no friend to photography and the results were mixed at best! Nonetheless we came to a decision between us and I returned to Ireland with nerves in my belly hoping that Dervla would love her new sapphire - happily she did and on her next trip back from London there was a silver sample ring to try. With that viewed and agreed it was time to order the metal and start work on the engagement ring proper.

Making a sapphire engagement ring

Making a sapphire engagement ring

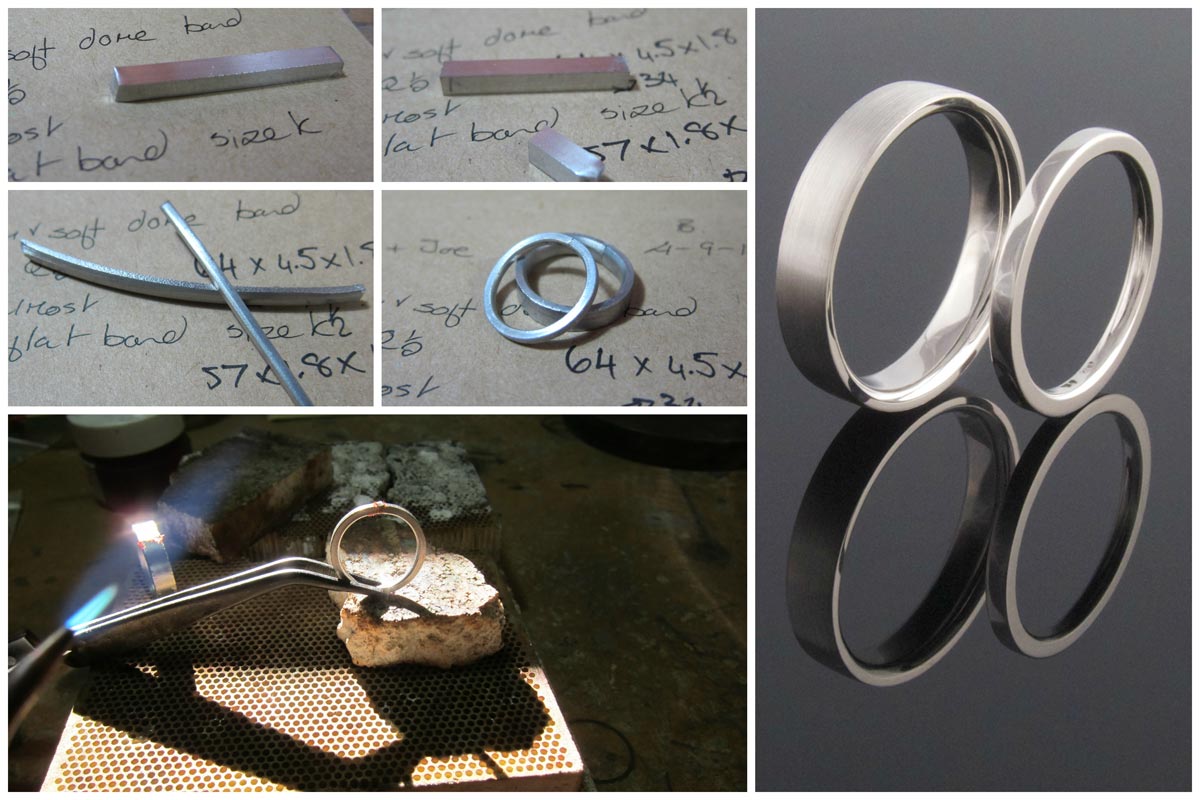
As you can see it started out with just three elements, the sapphire, a length of 18ct yellow gold bar for the shank and piece of sheet from which to make the setting. First of all I made up a tapering round setting from the sheet and formed it in to an oval to match the curve of the sapphire. Next I made the 2.5mm wide shank and removed a section where the solder seam was to accommodate the oval setting - no point having more seams than necessary. The two elements were then soldered together and dropped to the assay office in Dublin city to be tested and stamped. With that accomplished it was time to clean up the ring, remove any scratches and prepolish the inside of the setting. I then created a seat for the sapphire by removing metal from the inside of the bezel and pushed the yellow gold down onto the stone to hold it. A last polish and a little directional emery applied to the shank and that was that!

Hand made sapphire engagement ring

Hand made sapphire engagement ring

Dervla and Denis were back in town last weekend and came to collect. Impressively Denis had refused to see a picture of the ring before the big day preferring to "wait until I see it on Dearbhla's finger". I'm pleased to report that they left a very happy couple and that there may or may not have been tears!

Punch set diamond bangle remodel

I've been making an awful lot of recycled gold bangles of late and I thought I'd share this one which has been embellished with 5 round brilliant cut diamonds punch set at intervals across the top.

Punch set diamond bangle remodel

Punch set diamond bangle remodel

Rosie had the usual assortment of broken chains, odd earrings and unworn rings which amounted to some 25g of gold and which as you can see turned in to a lovely heavy weight, flat gold bangle. From the crucible the molten metal was poured into the ingot mould to make a rather gnarly looking ingot. It was then run through the rolling mills to make it into a smooth, workable bar of metal. This bar was repeatedly passed through the mills between annealings (softening the gold by heating and quenching) until it was 200mm long, 4.3mm wide and 2.7mm deep. The wire was then turned up into an oval and the soldered closed. Once the fire stain was cleaned back, any scratches removed and the bangle prepolished I marked out 5 equidistant points along the top of the bangle opposite the seam and set each with a 0.03ct diamond.

And there you have it, one gold bangle with diamonds!

Handmade peridot engagement ring

First things first...Yvette and Jay live in London and ordered their engagement ring via correspondence! You have no idea how impressed I am with them for taking such a leap of faith. They had come across my work over on One Fab Day and picked up the phone to place their order.

In the absense of a face to face meeting Yvette and I chatted about the shape of her hand, about skin tone and about the kind of work she does. That last one may seem strange, but lifestyle can really impact your choice of metal and stone. As she didn't intend to wear her engagement ring every day the whole range of gemstones was available to her including this relatively soft peridot which just so happens to be Jay's birth stone.

Handmaking a peridot engagement ring

Handmaking a peridot engagement ring

The top left image details the raw materials - two pieces of gold, one long for the shank and one wide for the setting and the lovely green peridot. First the wider piece was turned up into a conical bezel setting and then the longer length of gold into a ring. The two pieces were then fitted together via a series of cutting, filing and offering up the setting to the gap in the ring. When they fit perfectly they were soldered together with a little excess setting protruding. This excess was filed away before emerying and cleaning up the ring to take the peridot.

Handmade peridot engagement ring

Handmade peridot engagement ring

And here we have the finished ring which the guys flew in to collect one Monday morning. They are planning their wedding here in Dublin later this year and I wish them both the very best!


Contemporary gold dress ring remodel

Gold for recycling

Gold for recycling

What do you get the woman who has everything? This was the dilemma facing Gina and her sisters with their mum's 60th birthday fast approaching. It turns out mum Doreen had a number of old pieces including a 9ct yellow gold ingot which she no longer used and when she visited with me she told me how much she had always wanted an emerald ring. I didn't have any emeralds to hand, but no matter. She set her sights on this gorgeous green tourmaline cabochon and together we designed a simple if sizable contemporary dress ring.

Bezel set green tourmaline dress ring

Bezel set green tourmaline dress ring

The old gold was melted into an ingot and then recycled into a 3.5mm shank and heavy oval bezel setting. Both pieces were soldered together and the tourmaline set into this striking piece with the yellow gold accentuating the green tourmaline beautifully. One new ring for the birthday girl and enough gold left over for another little project in the future.

If you liked this post you can Link it, Pin it, Book it, Tweet or Tumble it using the grey share button to your left!

Old cut diamond stacking ring remodel

When I had completed Eleanor's old cut diamond earrings our next project together was to design a series of stacking gold rings with the remainder of her diamonds.

Gold and diamond stacking rings

Gold and diamond stacking rings

Diamond stackers

Diamond stackers

Eleanor's gold ring provided enough material for one of the new bands and I bought new 18ct for the other two bands and tubing for the settings. Diamonds are brilliant little things not least for their hardness, but they can also be heated without shattering like most gemstones would. This means that I was able to set each stone before soldering those settings into the bands. An added bonus to presetting the diamonds is that I could play with the arrangement of the stones as I went - creating a suitably random effect.

I love this style of stacking ring and every time it's worn the arrangement looks just a little bit different. Stackers give great flexiblity, with lots of scope to add new elements, even a couple of plain silver bands, down the line.


Handmade platinum diamond solitaire engagement ring

I've said it before and I'll say it again, I love making rings - especially engagement and wedding rings - something about the personal connection and the promise of forever gets me every time -  which is why I'm always chuffed to be involved with couples at such a happy time in their lives.

Handmaking a platinum solitaire diamond engagement ring

Handmaking a platinum solitaire diamond engagement ring

Joanne had been a follower of my "how it's made" posts over on facebook so when she and Dave decided to get engaged she had a fair idea of where to come. At the time I rarely made up collages of pieces that were made from scratch as opposed to recycled, but Dave put in a word and I kept this little photo diary of Joanne's engagement ring.

It started with a piece of square platinum bar which was forged using the rolling mill into a graduated shank. As you can see it's a bit bockety, but that roughness was easily removed. Next I made a round bezel setting and cut a groove in the shank to accommodate the belly of the diamond, before giving everything a good pre-polish. The bezel was positioned on top of the shank and soldered in place before the diamond was set (the two little silver bars pictured were purely to support the setting while pushing the metal over the stone).

Bezel set platinum solitaire engagement ring

Bezel set platinum solitaire engagement ring

One last buff on the polishing motor was followed by a covert call to Dave...

Before you know it this little engagement ring was winging its way to Germany in Dave's breast pocket, where he proposed to an unsuspecting Joanne at the Christmas markets...

...she said YES!

Recycled gold drop earrings with imperial topaz

When we first met, Isobel had a gold necklace that didn't fall quite right, along with some other little bits of gold jewellery and an array of stones. There was no shortage of possibilities, but a pair of faceted oval topaz stood out amongst her collection of gems and we plotted to make a dressy gold drop earring with a little movement to catch the eye.

Recycling an old gold chain into a new pair of gold and topaz drop earrings

Recycling an old gold chain into a new pair of gold and topaz drop earrings

Here's the new bracelet and a bar of gold made from the rest of the chain

Here's the new bracelet and a bar of gold made from the rest of the chain

As you can see from the scales we started out with 14g of gold which is well in excess of what was needed to complete this project so you'll be glad to hear that the troublesome necklace became a not so troublesome bracelet before the balance was melted.

Earrings like these require a number of different gauges of metal so I melted the gold into different little nuggets to create the bar for the stem, the flat sheet for each setting, not to mention the tiny little jump rings that would make the earrings bob. Each nugget was in turn milled and formed before being soldered together. The topaz were then set and everything was given a good polish before finally bending the stems into a dramatic hook.

If you liked this post embrace the little grey heart to your right!

18ct yelllow gold pinkie ring

18ct yellow gold pinkie ring carved from wax - Eva Dorney Goldsmith

Wax modelling is fast and accessible. It feels more sculptural in nature than forging and forming metal by hand. This commission involved designing and making an 18ct yellow gold saddle shaped pinkie ring that cleanly blended into a comfortably narrow shank at the back. It would have been possible to make a ring like this using anti-clastic raising (a technique where metal is hammered on different shaped stakes to bend and form it into beautifully defined curves), but I opted to carve it from wax. If however you'd like to see some beautiful anti-clastic work I'd recommend checking out fellow Irish goldsmith Jessica Poole.

Step by step by painstaking step

Step by step by painstaking step

Ring wax comes in 6 inch long tubes and it's a matter of cutting off a section within which to "find" the ring.  I went for a U shaped tube to accommodate the height of the ring and removed a 20mm wide section.

Working in wax varies from metal in that a few stokes of the file will remove a large amount of wax, but a relatively small amount of metal, making it very quick to manipulate, but also dangerously easy to remove too much material. As a result it's not so much a matter of "finding" that ring, rather of careful laying out and marking! All those little lines help to maintain symmetry and prevent accidents.

Once marked out, excess wax is sawed away before filing the rough shape of the ring - a messy business as you can see. Then, when the outline shape is good, it is refined and weighed and refined again until it is as light as possible.

A wax model weighs one tenth of the finished silver ring and about one fifteenth of 18ct gold - with such an expensive raw material every 0.1g  counts!

A wax model weighs one tenth of the finished silver ring and about one fifteenth of 18ct gold - with such an expensive raw material every 0.1g  counts!

When the model is finished and emeried to a nice polish it can be sent off for casting in what ever metal desired. In this case my first wax was too small so I had it cast in silver and had the larger one cast in 18ct. The models come back from the casters with this lovely low matt finish as you can see - too pretty to pass up a quick photo, but still in need of a good polish.

If you liked this post then try hitting the little grey heart to the right. You won't be disappointed!

Vintage drop diamond earring remodel

Diamond bar brooch

Diamond bar brooch

Eleanor loves jewellery as much as I do and when she asked me to design a set of vintage inspired earrings I was nervous. Vintage isn't my natural style, but I figure I'm game for a challenge. The diamonds were harvested from a beautiful old brooch and had it been anyone else I would have hesitated to break up such a lovely piece, but Eleanor assured me that should she need one she had an even finer specimen!

Doodles

Doodles

To start with I removed the diamonds from the brooch and began to play with their layout. I did some drawings and laid the diamonds on my preferred designs. Eleanor picked her favourite and I transferred this layout onto a piece the metal. In the spirit of that time the diamonds were set in silver with 18ct yellow gold hooks, jump rings and interestingly, back panels.

Drop earrings in the making

Drop earrings in the making


The largest diamonds were bezel set and soldered on to the silver plate before piercing out the scalloped pattern and soldering on gold jump rings. A further bezel set diamond was attached above the main panel for extra swoosh factor. The rest of the diamonds were then set and finished with milligrain (that tiny beaded effect), before adding the gold safety backed hoops.

Vintage style old cut diamond drop earrings

Vintage style old cut diamond drop earrings

A quick polish and they're done.


Recycled yellow gold bangle

When my sister got married she gave me a few quid to make myself a bridesmaid gift and I thought I'd turn that into a little something for both of us. I bought a length of 9ct yellow gold wire and now we have matching oval gold bangles.

It now turns out that this little bangle is one of the most popular items that I make from recycled gold. Part of the reason is the ease of wear (neither of us ever take them off, not even for airport security) and a bangle is also a cost effective way to use up a good quantity of gold without employing too much labour. That's one of the things about recycling...it would be easier to start with new material, but often times it's more economical or sentimentally sensitive to rework what's already there.

Which brings me to Anne, a friend of my sister's, who had long admired our little bangles. She had a gold gate bracelet that was of huge sentimental value, but which was never worn, so we devised a plan to melt it down and make her her own bangle.

Remodelled yellow gold bangle

Remodelled yellow gold bangle

In the collage you can see the bracelet in a nice fresh crucible before the torch is turned on it, meting it into a fluid ball before transferring it in one movement to the waiting ingot mould. From there the metal was milled and passed through a round draw plate until it was the right length and then turned up into a round. Next it was soldered and trued up on an oval bangle mandrel before an emery and final polish.

Gate bracelet transformation complete.

Bezel set old cut diamond studs

Well loved vintage five stone ring

Well loved vintage five stone ring

Sadly the centre stone from Barbara's antique five stone diamond ring fell out never to be seen again and the ring long languished in a drawer waiting on its time to shine once more.

Looking at the other pieces in her collection it seemed that diamond earrings were one of the few things missing, so we settled on making up low tapering bezels in 9ct white gold. 9ct is perfect in earrings because they don't see too much wear and tear and when rhodium plated the colour is exactly the same as 18ct, but not so the price!

Old cuts free from their mount

Old cuts free from their mount

When popped out of the mount you can see the shape of the old cuts is totally different from the modern round brilliant cut diamond. They are usually deeper and more cushion shaped. This shape is a little trickier to set than round, but I think you'll agree the finished earrings were worth the extra trouble.

Diamond studs

Diamond studs

And here they are...

Love how the cushion shape of the old cut still carries through to the bezel.

Remodelling an 18ct yellow and white gold illusion set diamond engagement ring - Part Two

Now that Geraldine had her new diamond cluster it was time for mum Patricia to put on her thinking cap. Most importantly she knew that she didn't want a high ring, rather something easy, with a little sparkle, that could be worn all the time...oh and that was going to complement her nice wide yellow gold wedding band.

Here's what became of the old gold mount.

Recycled fine pave set yellow gold eternity ring.

Recycled fine pave set yellow gold eternity ring.

Firstly I removed the white gold head from the yellow gold shank (they don't melt well together) and melted it into the lovely little nugget pictured. That was passed through the mill to make it long and skinny, turned up into a fine gold band and set with 40 half pointers (or 0.005ct round brilliant cut diamonds).

Hey presto - a fine pave set eternity ring with diamonds over two thirds of the way around.

Remodelling an 18ct yellow and white gold illusion set diamond engagement ring - Part One

This is the first of two entries involving an 18ct yellow and white gold illusion set diamond engagement ring. The diamond was given to Geraldine by her mum and she called me to see what might be done. We took a look at all of her current jewellery including her own wedding and engagement rings and devised a plan....

Platinum halo engagement and wedding ring set - Diamond pendant

Platinum halo engagement and wedding ring set - Diamond pendant

I made up a new platinum mount to take the round brilliant cut diamond - a pave set halo design with clearance underneath for a wedding band to sit flush. Next I cut the diamond out of her engagement ring with the setting intact and with a little additional platinum used the shank to make a new plain band to sit next to the cluster. I added a bale to the engagement diamond setting and transformed it into an everyday diamond pendant and in the meantime the existing diamond set wedding ring made it's way to the left hand as an eternity ring.

This project worked out a treat with everything in use and all the metal used up except for the old gold mount... more of which to follow.

Making platinum wedding bands

I love making wedding bands and happily I'm asked to make a lot of them. As part of the process I'll usually do up a collage of how the rings were made - one of which is pictured here.

Handmade platinum wedding band collage

Handmade platinum wedding band collage

The first step in making a pair of bands is to calculate how much metal is needed. The gauge of metal and length will vary depending on the overall width of ring required, but when two bands are being made from the one piece of metal the wider band determines the width of platinum bar needed.

Next up the bar is cut into two parts and then rolled through a mill until each piece is the desired width, depth and length.

These lengths of platinum are then turned up into rings and soldered or fused using an oxy propane torch. Platinum temperatures reach in excess of 1700C during this process.

Once soldered the rings are trued up on a mandril, before being sent to assay. They're then emeried to remove any marks or blemishes and polished to a high shine. Any surface finishes can be applied at this stage. Simples!

Making a platinum 5 stone diamond ring

On the top left you can see an 18ct gold and diamond bracelet which was the jumping off point for this design. By the time I thought to take a photo I'd already cut out the diamonds, but you get the picture!

Below is the master model made in silver. It could have been made directly in platinum, but this sample alowed my customer to make some final tweaks to the design and saved on costly platinum waste.

Next up is the platinum casting, back from the assay, all cleaned up and ready to set.

Lastly we have the finished platinum 5 stone ring. The diamonds are effectively bezel set with a  milligrain detail.

Platinum 5 stone diamond ring collage

Platinum 5 stone diamond ring collage

Punch setting a recycled yellow gold ring

If you wince when you think about the old charms, odd earrings and broken chains languishing in your drawers think again... Why not melt the lot?

Tapering yellow gold ring made from recycled metal with a smattering of punch set diamonds

Tapering yellow gold ring made from recycled metal with a smattering of punch set diamonds

Nothing gives me greater pleasure than taking those unloved bits and bobs of gold and transforming them into a new and wearable piece of jewellery.

Lorraine had a number of rings and chains that she no longer wore so we set about designing a piece that would use up her metal and suit her lifestyle. We came up with this heavy weight tapering gold ring which I made by melting her old gold and then setting it with diamonds to lend a little sparkle to proceedings. Lastly Lorraine opted for a heavy matt finish which adds to the contemporary feel of the ring.